ATTINY88 Micro Development Board 16MHz Digispark ATtiny85 Upgrade for Arduino
ATTINY88 Micro Development Board 16MHz Digispark ATtiny85 Upgrade for Arduino
Couldn't load pickup availability
📋 Overview
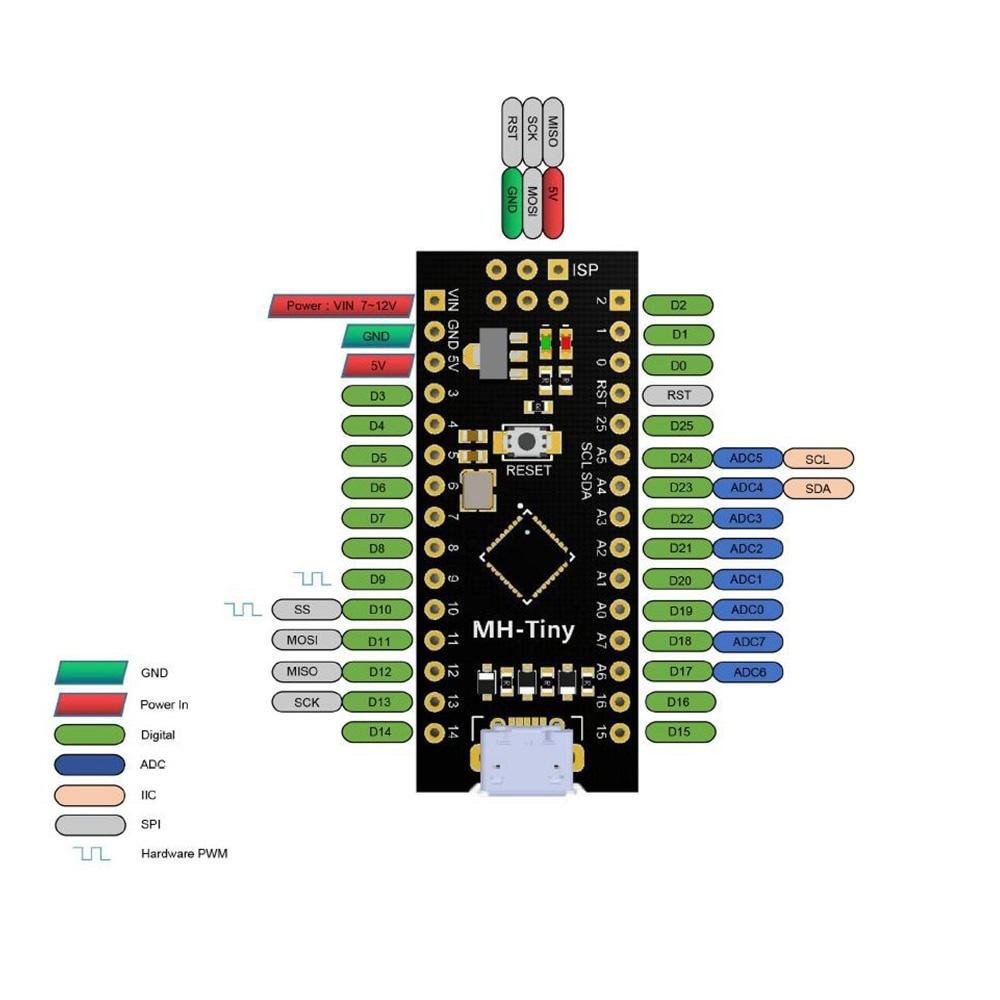
The ATTINY88 Micro Development Board is a compact, Arduino-compatible microcontroller board powered by the Microchip ATtiny88 running at 16MHz. Designed as a direct upgrade from the popular Digispark ATtiny85, it delivers significantly more I/O — 28 GPIO pins, 8 analog inputs, and hardware I2C and SPI — all in a tiny, breadboard-friendly Nano-style form factor with convenient Micro-USB programming.
⭐ Key Features & Benefits
- ATtiny88 Microcontroller at 16MHz — 8-bit AVR RISC architecture with external crystal for reliable timing
- 28 GPIO Pins — A massive upgrade from the ATtiny85's 8 pins, giving you room for complex projects
- 8 Analog Input Channels (A0–A7) — 10-bit ADC resolution for reading sensors, potentiometers, and more
- Hardware I2C and SPI — Connect OLED displays, sensors, SD cards, and other peripherals directly
- Micro-USB Programming — Upload sketches directly from the Arduino IDE using the built-in Micronucleus bootloader — no external programmer needed
- Arduino IDE Compatible — Write and upload code using the familiar Arduino environment and libraries
- Compact Nano-Style Form Factor — Breadboard-friendly dual inline headers fit standard solderless breadboards
- Onboard LED on Pin 0 — Ready for immediate testing right out of the box
📊 Specifications
| Microcontroller | Microchip ATtiny88 |
| Architecture | 8-bit AVR RISC |
| Clock Speed | 16 MHz (external crystal) |
| Flash Memory | 8 KB (approx. 6 KB available after bootloader) |
| SRAM | 512 Bytes |
| EEPROM | 64 Bytes |
| Digital I/O Pins | 28 |
| Analog Input Channels | 8 (10-bit ADC) — A0 through A7 |
| PWM Outputs | 2 (Pins D9 and D10) |
| Communication | I2C (TWI), SPI — No hardware UART |
| USB Interface | Micro-USB (Micronucleus bootloader) |
| Operating Voltage | 5V |
| Input Voltage (VIN) | 7–12V DC |
| Max Current per I/O Pin | 40 mA |
| Onboard LED | Pin 0 (PD0) |
| Board Dimensions | Approx. 44.5 × 18.3 × 3 mm (1.75 × 0.72 × 0.12 inches) L × W × H |
📦 What's in the Box
- 1× ATTINY88 Micro Development Board
- 2× Header pin strips (unsoldered)
📝 Note: Micro-USB cable is not included and must be purchased separately. Header pins require soldering for breadboard use.
🔌 Compatible With
- Arduino IDE (version 1.6.x and later, including Arduino IDE 2.x)
- I2C devices — OLED displays (SSD1306), temperature sensors (BMP280, DS18B20), real-time clocks (DS3231)
- SPI devices — SD card modules, shift registers, LED drivers
- Analog and digital sensors — Potentiometers, photoresistors, thermistors, PIR sensors
- Standard solderless breadboards
- Windows 7/8/10/11, macOS, and Linux
🎯 Common Applications
- Learning & Prototyping — An affordable, compact board for learning Arduino-style programming and electronics
- Compact Sensor Nodes — Small enough for embedded sensor projects where a full Arduino is too large
- Wearable Electronics — Lightweight and low-power for wearable gadgets and accessories
- LED Controllers — Drive LEDs, small displays, and lighting effects with plenty of I/O pins
- USB Input Devices — Build custom USB controllers, macro pads, or HID devices
- ATtiny85 Upgrade Projects — Drop-in replacement when your Digispark project outgrows 6 I/O pins
🚀 Getting Started
Setting up the ATTINY88 Micro Development Board is straightforward:
- Install the Digispark/Micronucleus USB driver on your computer (Windows requires manual driver install; macOS and Linux typically work automatically).
- Add the MH-ET LIVE board manager URL to your Arduino IDE preferences and install the board package.
- Select "MH-ET LIVE Tiny88 (16.0MHz)" as your board in the Arduino IDE.
- Write your sketch, click Upload, then plug in the board when prompted — the Micronucleus bootloader handles the rest.
💡 Tip: See our complete User Guide linked below for detailed driver installation, board manager setup, pinout tables, sample code, and troubleshooting tips.
⚠️ Important Notes
- No Hardware UART: The ATtiny88 does not have a built-in serial port. Use the SoftwareSerial library if your project requires serial communication.
- Limited PWM: Only 2 pins (D9 and D10) support hardware PWM — fewer than a standard Arduino Uno.
- Upload Sequence: Click Upload in the IDE first, then plug in the board when prompted. This is the opposite of most Arduino boards.
- Header Pins Require Soldering: The included header pin strips are unsoldered. A soldering iron is needed to attach them for breadboard use.
- 5V Logic Only: All I/O pins operate at 5V. Use a level shifter when connecting to 3.3V devices.
📄 Documentation & Resources
- User Guide — Pinout, Arduino IDE Setup, Driver Installation, Sample Code & Troubleshooting
- All Arduino-Compatible Microcontroller User Guides
Sold and supported by Envistia Mall. Ships from the USA. For wiring diagrams, sample code, and troubleshooting, see the User Guide. The manufacturer and Envistia LLC (dba Envistia Mall) are not responsible for any damages or losses resulting from the use of this product. Always follow proper electrical safety practices when working with electronic components. Specifications are based on manufacturer data and are subject to change without notice.
Share